A Practical Guide to Piloting Virtual Reality in The Classroom
Virtual Reality (VR) has the potential to amplify your impact as a teacher, creating immersive and interactive experiences that engage students and enhance learning outcomes. Introducing virtual reality (VR) into the classroom, however, requires thoughtful planning and execution. This guide offers practical advice for teachers on establishing a pilot program for VR in their classrooms, including planning, implementation, evaluation, and expansion strategies to maximize its potential for success.
Planning the Pilot
A successful VR pilot begins with careful preparation. Here’s how to get started:
1. Define Goals and Objectives
Identify your goals for the VR pilot. Are you looking to improve student engagement generally or for a specific academic subject? What classroom skills do you hope your students will improve? Next, align these goals with your curriculum standards and learning outcomes. For example, a chemistry teacher might use VR to supplement students’ exploration of molecular structures or allow students to conduct virtual chemistry experiments safely. Identifying the primary goal will help you select the most suitable content to use and determine how it will fit into your overall curriculum.
2. Select the Right Content
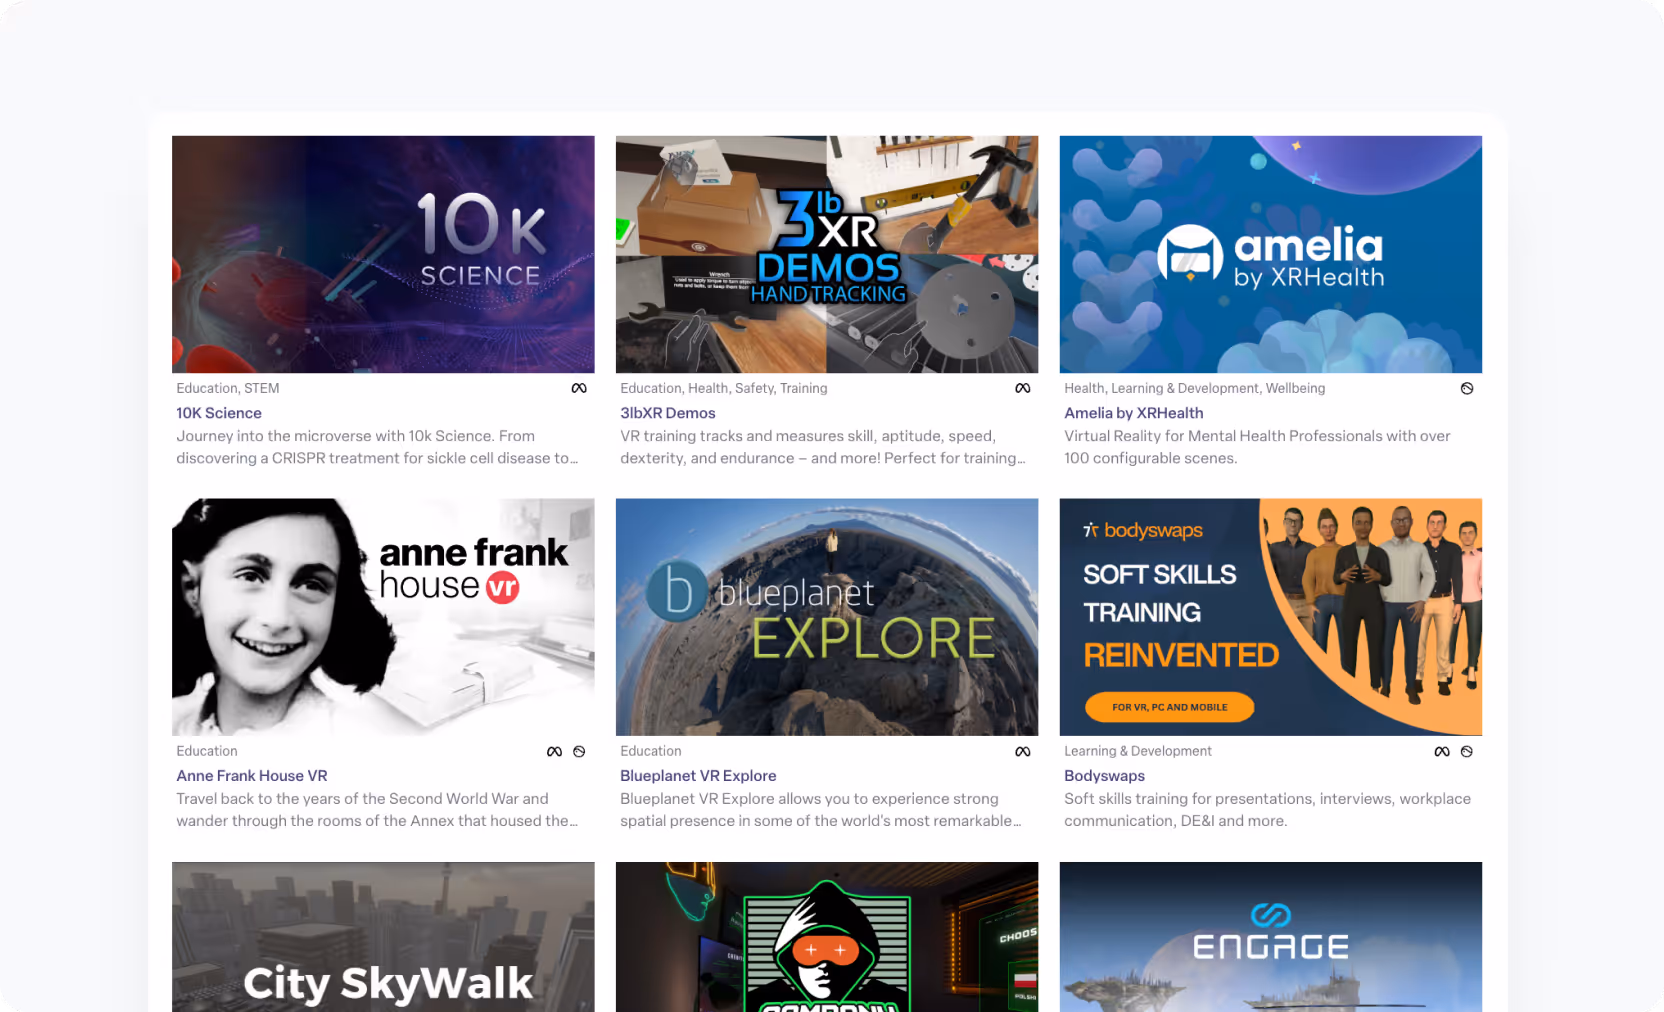
VR is already active in thousands of schools globally, so it's likely that the content you want to use already exists. Research VR applications that align with your subject area.
Discover XR, ManageXR’s built-in content library, is a great place to start searching for relevant VR content. Discover XR makes it easy to test out popular apps and find the right content for your deployment. On Discover XR, you can add demo versions of apps to your devices to trial them before making purchases for your fleet. Top educational apps include Anne Frank House for history, Math World for mathematics, and Proteus Labs for chemistry.
3. Choose Appropriate Hardware
Once you know what content you’d like to use for your XR deployment, you are ready to select the appropriate headset. Determine which hardware specifications are important for your deployment. Evaluate factors like cost, ease of setup, comfort, and compatibility with your chosen content. Other important features to consider include:
Storage: How much content do you want to store on your devices? This will be determined by the complexity and breadth of VR content needed for your VR program.
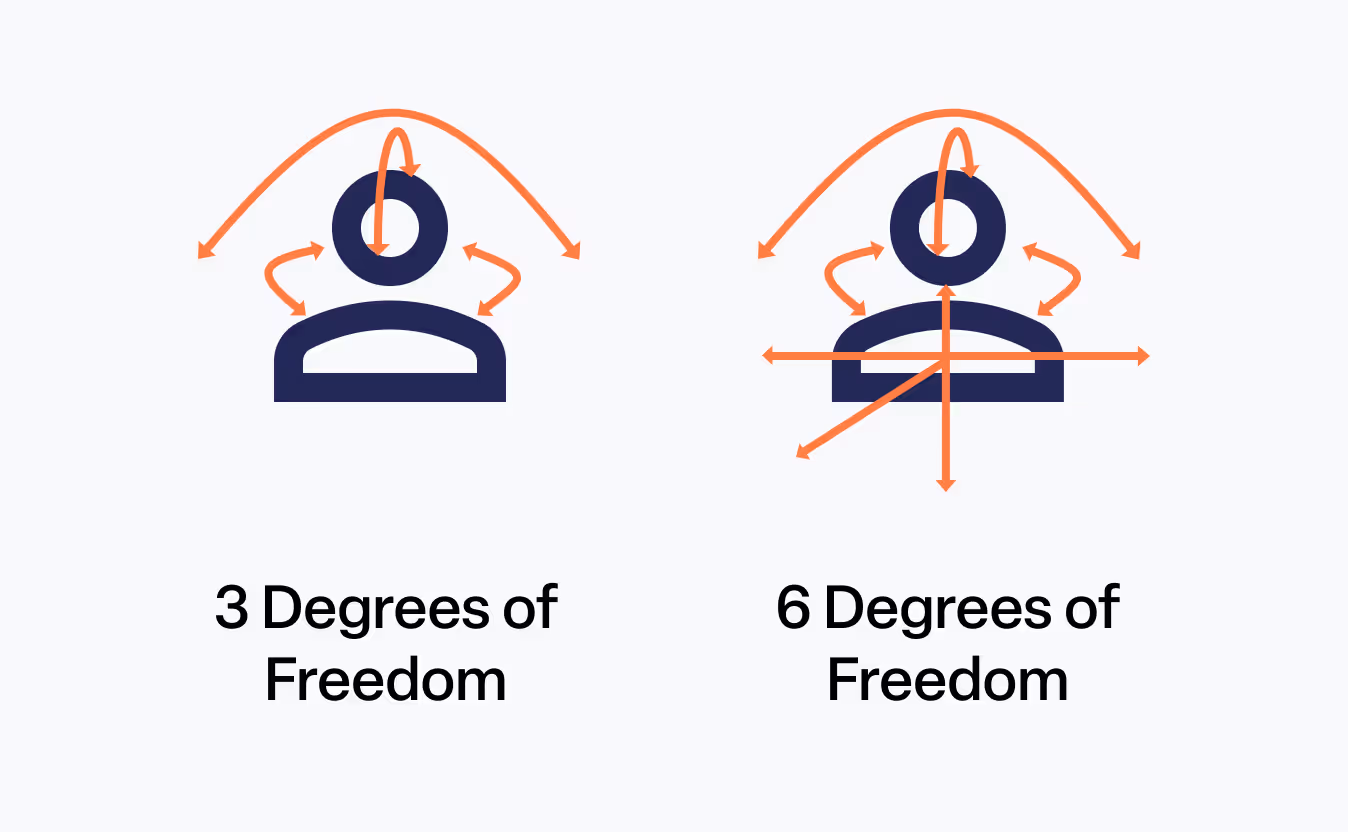
3 DoF or 6 DoF: Does your device support three degrees of freedom or six? 3 DoF devices track head rotation only. Users can look around but not move through space. 6 DoF devices track both rotation and position, allowing users to walk, lean, and interact more naturally within the virtual environment. Most modern XR headsets offer 6 DoF for a more immersive experience.
Hand Tracking: Does the device allow users to navigate with only their hands, eliminating the need for remotes?
Eye Tracking: Does the device have powerful eye tracking which can enhance visual quality or allow a hands-free VR experience?
See our article on comparing headsets for education for a complete breakdown of VR hardware and their compatibility with the classroom.
It’s helpful to try out different headsets and how well they work with your desired VR content. We strongly recommend purchasing through hardware resellers, which can provision devices with your selected content and offer expert support for large-scale deployments. Hardware resellers also offer the best pricing and discounts on bulk purchases.
4. Select a Device Management Platform
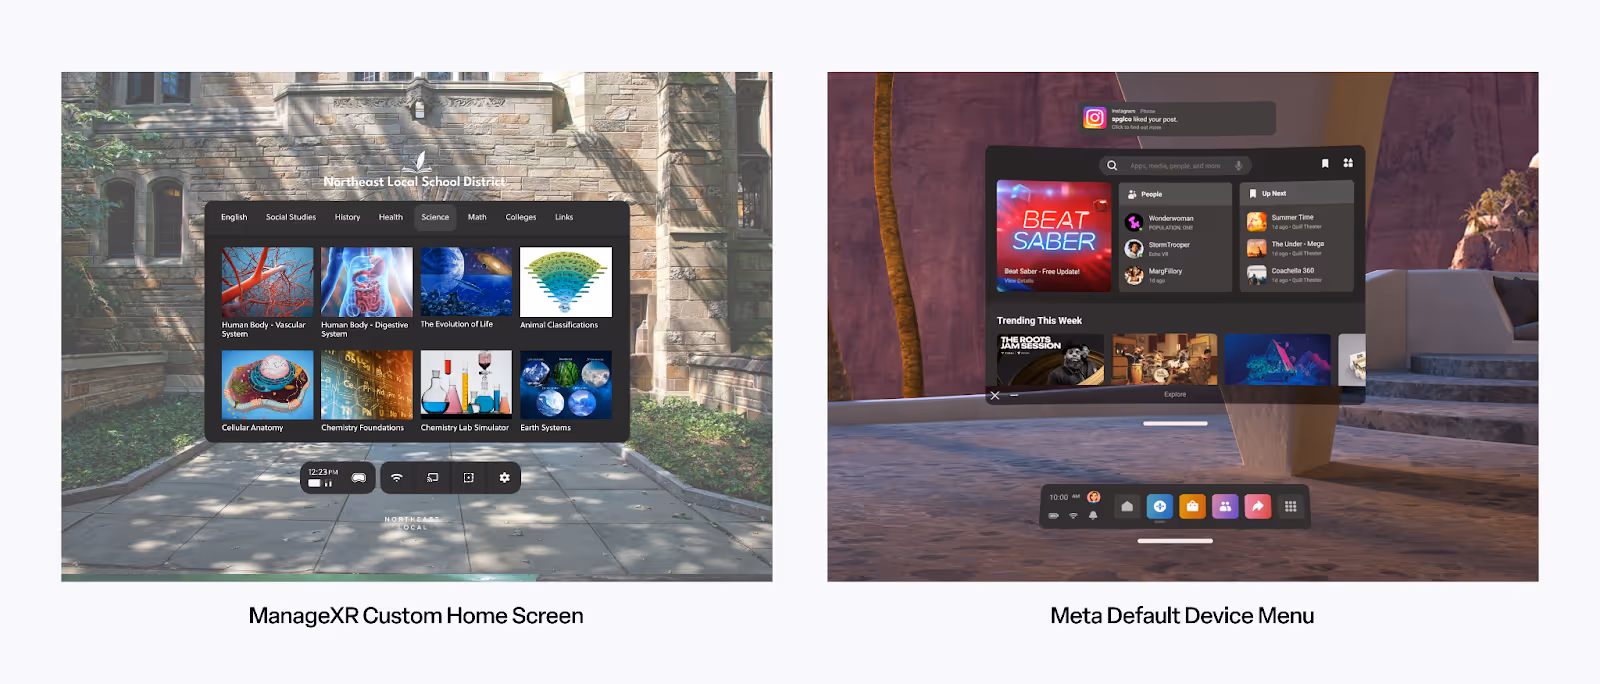
Device management is a necessary yet often overlooked aspect of deploying VR. Managing VR devices without a management platform is cumbersome. You will need to upload content, update firmware, and adjust settings of each headset one by one. The default device navigation menus are also designed for consumer purposes, rather than a controlled classroom environment, and include features such as app stores, internet browsing, and message notifications that distract from instruction.
XR device management platforms, such as ManageXR, provide simplified, locked-down device experiences for users, while also offering the necessary oversight and control for teachers. With ManageXR, you can bulk-deploy content to all of your devices, adjust device settings, decide what content appears on which devices, and track usage analytics.
Want to demonstrate a VR activity on a device to the entire classroom? Use ManageXR’s remote screen streaming feature to broadcast the VR experience in real time. Teachers also use this feature to see inside their students’ headsets to help guide students and troubleshoot issues if they arise.
It’s a good idea to involve your school’s IT department when considering a device management platform. School Wi-Fi networks often include restrictions such as blocked websites. IT can help you remove these restrictions to ensure uninterrupted access to your XR content. In ManageXR, the IT team can also deploy a Wi-Fi network to automatically connect devices to the internet, and set up a secure enterprise network.
5. Prepare Your Classroom
Ensure your classroom has adequate space for safe VR use. A 10 x 10 foot area per student is ideal if your VR apps require students to stand and walk about, or are in 6 DoF. However, many deployments may only require desk space if the VR apps are stationary, in 3 DoF.
Other considerations beyond spacing include WiFi capacity, device charging infrastructure, and device cleaning supplies. Involve IT staff early to troubleshoot potential technical issues and ensure a smooth deployment.
6. Prepare Your Teachers
Help your teachers prepare to manage a VR classroom by organizing training sessions. Teachers need to feel comfortable with VR technology before they can adequately support students. This way, teachers are prepared to swiftly launch VR classes and troubleshoot any issues that may arise.
Teachers should also try the VR apps themselves and be experienced enough to troubleshoot the app if a student has an issue. They should be prepared to use ManageXR to send remote commands to devices, like remotely pushing an app to a student’s device or remotely powering off a device.
The better prepared teachers are to run VR classes, the more value students can take from the program. Time wasted on troubleshooting or technical delays is time that students could have been spent learning in VR.
Running the Pilot
Once your pilot is planned, it’s time to implement it in the classroom. Here are some best practices to consider as you get started.
1. Start Small
Begin with a single class or a small group of students to minimize challenges and gather initial feedback. Plan to limit VR sessions to 20–30 minutes to prevent fatigue and gather regular feedback.
2. Introduce Students Gradually
Provide a brief orientation on how to use the headsets safely and effectively. Guide them on what to expect and the desired benefits from using VR. Allow students time to explore the technology before diving into lesson-specific activities. Students should feel comfortable turning the device on, navigating between apps, and using the remotes.
3. Create a Structured Lesson Plan
Virtual reality is most effective when it’s embedded into the curriculum as a key instructional tool, and not as a one-off activity or reward. For example, incorporate Human Anatomy VR directly into your biology unit on organ systems, using it to visualize content students are already learning. Surround each VR session with structured pre- and post-activities that reinforce core learning objectives and spark deeper understanding.
Programs like Prisms are designed with this approach in mind, offering full STEM learning modules aligned to curriculum standards. Teachers use Prisms not as a supplement, but as a centerpiece of instruction. Students complete lessons, solve problems, and explore abstract concepts in VR, followed by guided discussions and take-home assignments that extend the learning.
When VR is woven into lesson plans with intention, it becomes a powerful tool for engagement, comprehension, and retention.
4. Monitor Engagement
Observe how students interact with the technology and whether it enhances their understanding of the material. Use tools like screen casting to monitor student progress in real-time.
Evaluating the Pilot
Evaluation is critical to understanding the impact of VR on student learning and determining whether it’s worth expanding the program. It’s important to think about how you’ll measure success before starting, so you can ensure the right benchmarks are in place before starting.
1. Collect Feedback from Students
Use surveys or informal discussions to gauge student engagement and satisfaction. Ask specific questions such as “Did you enjoy using VR?” “Did it help you understand the topic better?” and “What challenges did you face?”
2. Assess Learning Outcomes
Compare student performance before and after using VR through quizzes or assignments. You can also compare performance between classrooms that implemented VR and classrooms that did not. Quantifying the impact that VR has on your students’ learning and engagement will help you advocate for the expansion of the pilot program.
3. Reflect on Teacher Experience
Document your own observations about ease of use, technical challenges, and alignment with educational objectives. Ask teachers for feedback on how they felt the VR classes were. Specifically, did teachers feel comfortable running VR classes? Did teachers see increased engagement among students? If teachers could make any improvements to the program, what would they be? This feedback will improve your VR program when you expand the pilot to other classrooms.
4. Analyze Usage Data on ManageXR Analytics
On the ManageXR web console, see usage analytics about your fleet to determine which content was used most frequently and which devices were most active. Use these metrics to understand the types of content that will have the most impact, as well as identify which classrooms are successfully utilizing XR devices on a regular basis.
Expanding the Pilot
If your pilot proves successful, you can make a case for expanding its use across more classes and schools. It’s critical to identify and speak with key stakeholders early, and then develop a plan to successfully expand the pilot.
1. Build a Proposal for Administrators
To secure buy-in from school leaders, present data from your pilot showing improved engagement or learning outcomes. It can be helpful to highlight the cost-effectiveness of VR resources by comparing them to traditional alternatives, such as field trips or physical lab equipment. Consider showcasing testimonials from students and teachers involved in the pilot.
2. Engage IT
After a decision has been made to scale your pilot, departments like IT typically become involved and introduce new requirements, such as security reviews. Some of these requirements can be an unexpected challenge within the school’s time and budget constraints. Starting these conversations early can help you expand your pilot rather than losing momentum.
3. Scale Gradually
Expand VR use incrementally by adding more classes or subjects while ensuring adequate support. Consider creating a shared library of headsets that can be rotated among classrooms. For more resources on deploying VR at scale, see “3 Tips for Moving Past the Pilot Program."
4. Designate a VR Leader and Support Team
The most effective VR deployments have a designated leader to maintain and expand the program. This individual is responsible for maintaining the devices, communicating between teachers and stakeholders, and generally overseeing the program through ManageXR, or your preferred device management platform.
In schools with older students, we recommend creating a team of student VR specialists to support the program’s operations. This includes maintaining, troubleshooting, and charging devices. Not only does this expand the support available for the VR program, but also gives students the unique opportunity to learn about a new technology and lead a new initiative at their school. It fosters leadership, technical skills, and real-world problem-solving, all while strengthening the sustainability of your VR program.
Additional Tips for Success
- Involve Students in Decision-Making: Let students test different headsets during the planning phase to ensure comfort and usability.
- Offer continued support: New VR tools are always launching, so it's important to keep students and teachers up to date on best practices. Host regular training sessions as new updates are released.
- Leverage Existing Resources: Use Discover XR to find and trial verified and trusted content aligned with your curriculum needs.
- Focus on Accessibility: Ensure all students can participate by considering headset fit adjustments or alternative content delivery methods for those unable to use VR directly.
- Document Progress: Keep detailed records of what worked well during each phase of the pilot for future reference.
Key Takeaways
When done thoughtfully, piloting virtual reality in your classroom can unlock new possibilities for student engagement and learning outcomes. By following these steps to launch a successful pilot program, you can create a compelling case for integrating this transformative technology into your school’s curriculum.
The Kentucky Department of Education launched a 50-device pilot program with ManageXR that scaled to over 2,000 devices across the entire school district.
Learn more about how to scale your VR program with ManageXR. Book a meeting today.
Frequently Asked Questions (FAQ) About Piloting VR in the Classroom
1. How do I choose the right VR headset for my classroom?
When selecting a VR headset, consider factors like:
- Ease of Use: Standalone headsets like Meta Quest 3S or PICO 4 Ultra Enterprise are ideal for classrooms as they don’t require a separate PC or external sensors.
- Cost: Compare prices and look for education discounts or bundles.
- Content Compatibility: Ensure the headset supports the educational apps you plan to use.
- Durability: Choose headsets designed for frequent use by students, with adjustable straps and protective cases.
2. How do I find VR content that aligns with my curriculum?
To find VR content:
- Use platforms like ManageXR’s Discover XR, which offers curated educational apps across subjects like STEM, history, and language arts.
- Search for subject-specific apps like Prisms VR for math or Titans of Space for astronomy.
- Reach out to developers directly if you need custom content tailored to your lesson plans (Check out Discover XR to contact content providers directly).
3. What steps should I take to prepare students for using VR?
Preparing students is key to a successful pilot:
- Start with a brief orientation on how to use the headset safely (e.g., adjusting straps, cleaning lenses).
- Set clear expectations about how VR fits into the lesson and what they’ll be doing.
- Allow students time to explore the technology before diving into structured activities.
- Emphasize safety by ensuring students have enough physical space and take breaks after 20–30 minutes of use.
4. How do I evaluate whether the VR pilot was successful?
To measure success:
- Collect student feedback through surveys or discussions. Ask about their engagement, understanding of the material, and any challenges they faced.
- Assess learning outcomes by comparing performance on quizzes or assignments before and after using VR.
- Document your own observations about ease of use, technical issues, and alignment with your teaching objectives.
- Compile both qualitative (feedback) and quantitative (test scores) data to present a well-rounded evaluation.
5. How can I make a case to administrators for expanding the pilot?
To secure buy-in from school leaders:
- Present data from your pilot showing improved student engagement and learning outcomes.
- Highlight cost-effectiveness by comparing VR resources to traditional methods (e.g., field trips or lab equipment).
- Share testimonials from students and teachers involved in the pilot to illustrate its impact.
- Emphasize scalability by explaining how tools like ManageXR simplify device management across multiple classrooms.
By addressing these common questions, teachers can feel more confident about piloting VR in their classrooms and advocating for its broader adoption.
Glossary: Know Before You Pilot
Kiosk Mode: A device setting that locks the headset to a specific app or experience, preventing students from accessing other content or settings. Ideal for maintaining focus and reducing classroom management challenges.
Default Device Menu: The hardware’s default interface or home screen students see when they put on the headset. Customizing this menu on ManageXR can streamline access to the right apps and reduce confusion or misuse.
ISV (Independent Software Vendor): A company that creates and sells software, such as educational VR apps, independent of the hardware manufacturer. ISVs are often the developers behind subject-specific VR content used in classrooms. An example is Prisms.
Instant App (Available through Discover XR): A VR app that can be launched immediately on a device without requiring a full installation. Instant apps make it easy to test or run content quickly, especially in pilot programs or shared device environments.
Content Provider (Available through Discover XR): An organization or company that supplies VR experiences for education. This can include ISVs, curriculum developers, or platforms offering access to a library of apps.
Hardware Partner (Available through Discover XR): A company that supplies the physical VR headsets and related equipment. They may also provision devices with your program’s content, offer technical support, warranty services, and guidance on device setup for schools.


