How to Run a Successful VR Classroom
Bringing virtual reality into the classroom can be transformative. At ManageXR, we’ve partnered with more than 900 school districts to help educators integrate VR into their curriculum. This guide shares practical strategies, routines, and best practices for running successful VR classrooms.
If you're brand new to VR, we recommend beginning with our Pilot Program Guide to lay a strong foundation before scaling to full classrooms. If you are just getting started with ManageXR, check out our Get Started with ManageXR Guide to learn how to use our most powerful device management features.
Types of VR classrooms
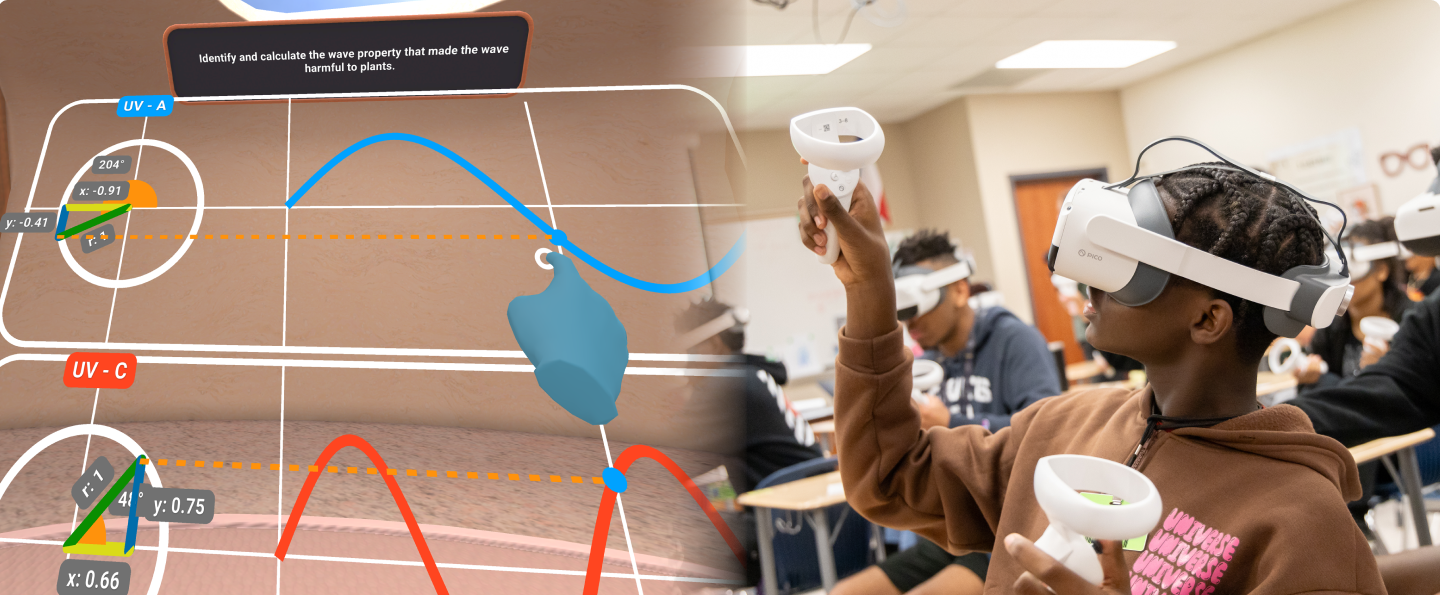
There are a variety of formats your VR classroom can follow, depending on the objectives your VR program has. Embedding VR into your existing curriculum can help reinforce key concepts. For example, pairing a human anatomy VR experience with a biology unit on organ systems allows students to see and manipulate the structures they are learning about. Surrounding each VR session with primer activities and assessment activities prompts deeper learning as well.
Some programs, such as Prisms, are intentionally designed for this integrated approach. Prisms offers full STEM learning modules aligned with curriculum standards. In these classrooms, students explore concepts in VR, apply their learning through problem-solving tasks, and then participate in guided discussions, written reflections, or take-home assignments that extend the experience.
Schools organize their VR classrooms in several ways depending on their goals, staffing, available devices, and curriculum model. Below are some examples of VR class formats:
1. Group VR Session
- Every student in the class uses a VR headset for a focused 15–20 minute session.
- The VR experience is followed by discussion, group work, journaling, or assessment.
- Use ManageXR to deploy content to each device, and view each student’s screens in real time with Rooms.
- Needs one VR device per student.
2. Lab-style Rotation
- VR is one of several stations students rotate through (e.g. VR, independent practice, small-group instruction).
- Use Kiosk Mode to lock students into the right VR content. As soon as the user puts on the headset, they are immediately placed inside the chosen content, so no navigation is required. Once complete, the headset will reset for the next student.
- Works well when device quantity is limited.
Selecting the right format helps determine the content that will work best for your classroom goals. Once you’ve identified the structure that aligns with your teaching style and resources, explore our curated list of the most popular VR apps educators use to enhance learning.
Preparing your classroom
The physical classroom environment should align with your VR curriculum so that each student has a safe amount of space to move throughout the virtual environment. Your classroom should be arranged to maximize safety and efficiency.
- Space Requirements
- For 6 DoF experiences, aim for approximately 10 × 10 feet per student so they can move freely and safely. Many schools will place a mat on the floor to designate the VR space. Learn how Maria College structures its VR classroom to ensure safety and impact.
- For stationary or 3 DoF experiences, students may remain seated, requiring only desk space.
3 DoF devices track head rotation only. Users can look around but not move through space. 6 DoF devices track both rotation and position, allowing users to walk, lean, and interact more naturally within the virtual environment. Most modern XR headsets offer 6 DoF for a more immersive experience.

- Safety Considerations
Keep walkways clear and remove tripping hazards so students can safely move while wearing headsets. - Storage & Charging
Plan for an organized storage solution such as charging carts or wall-mounted stations that keeps devices charged, clean, and ready for the next VR session. - Device Labeling and Identification
Make sure each headset and controller is clearly labeled with a number or name for easy identification. On ManageXR, you can assign digital device names that match your physical labels. - Preparing Your Network & Infrastructure.
For the smoothest deployment, VR devices should operate on their own independent Wi-Fi network. This dedicated network provides the bandwidth and speed needed for large VR app downloads and updates. See our full network deployment guide for step-by-step instructions on preparing your network for a VR classroom.
Preparing your devices
Preparing devices before students arrive is essential for ensuring a smooth, interruption-free VR lesson. You’ll want to ensure that your devices have the right user experience, settings, and content downloaded and ready for use. You can bundle the device experience, settings, and content through configurations, which you can then deploy to your devices. Use the following checklist to confirm that all headsets are ready for action:
Battery Checks
Confirm that all devices are fully charged and powered on. Low batteries can cut sessions short and disrupt the flow of your lesson, so it’s helpful to keep spare batteries, charging cables, or a few backup devices available. ManageXR lets you check your device and remote battery levels, making it easy to identify and resolve issues before class begins. Navigate to the devices tab, and see a list view of all devices in your organization. Then, sort by battery health to see which devices have low battery and require charging.

Ensure your VR content is updated
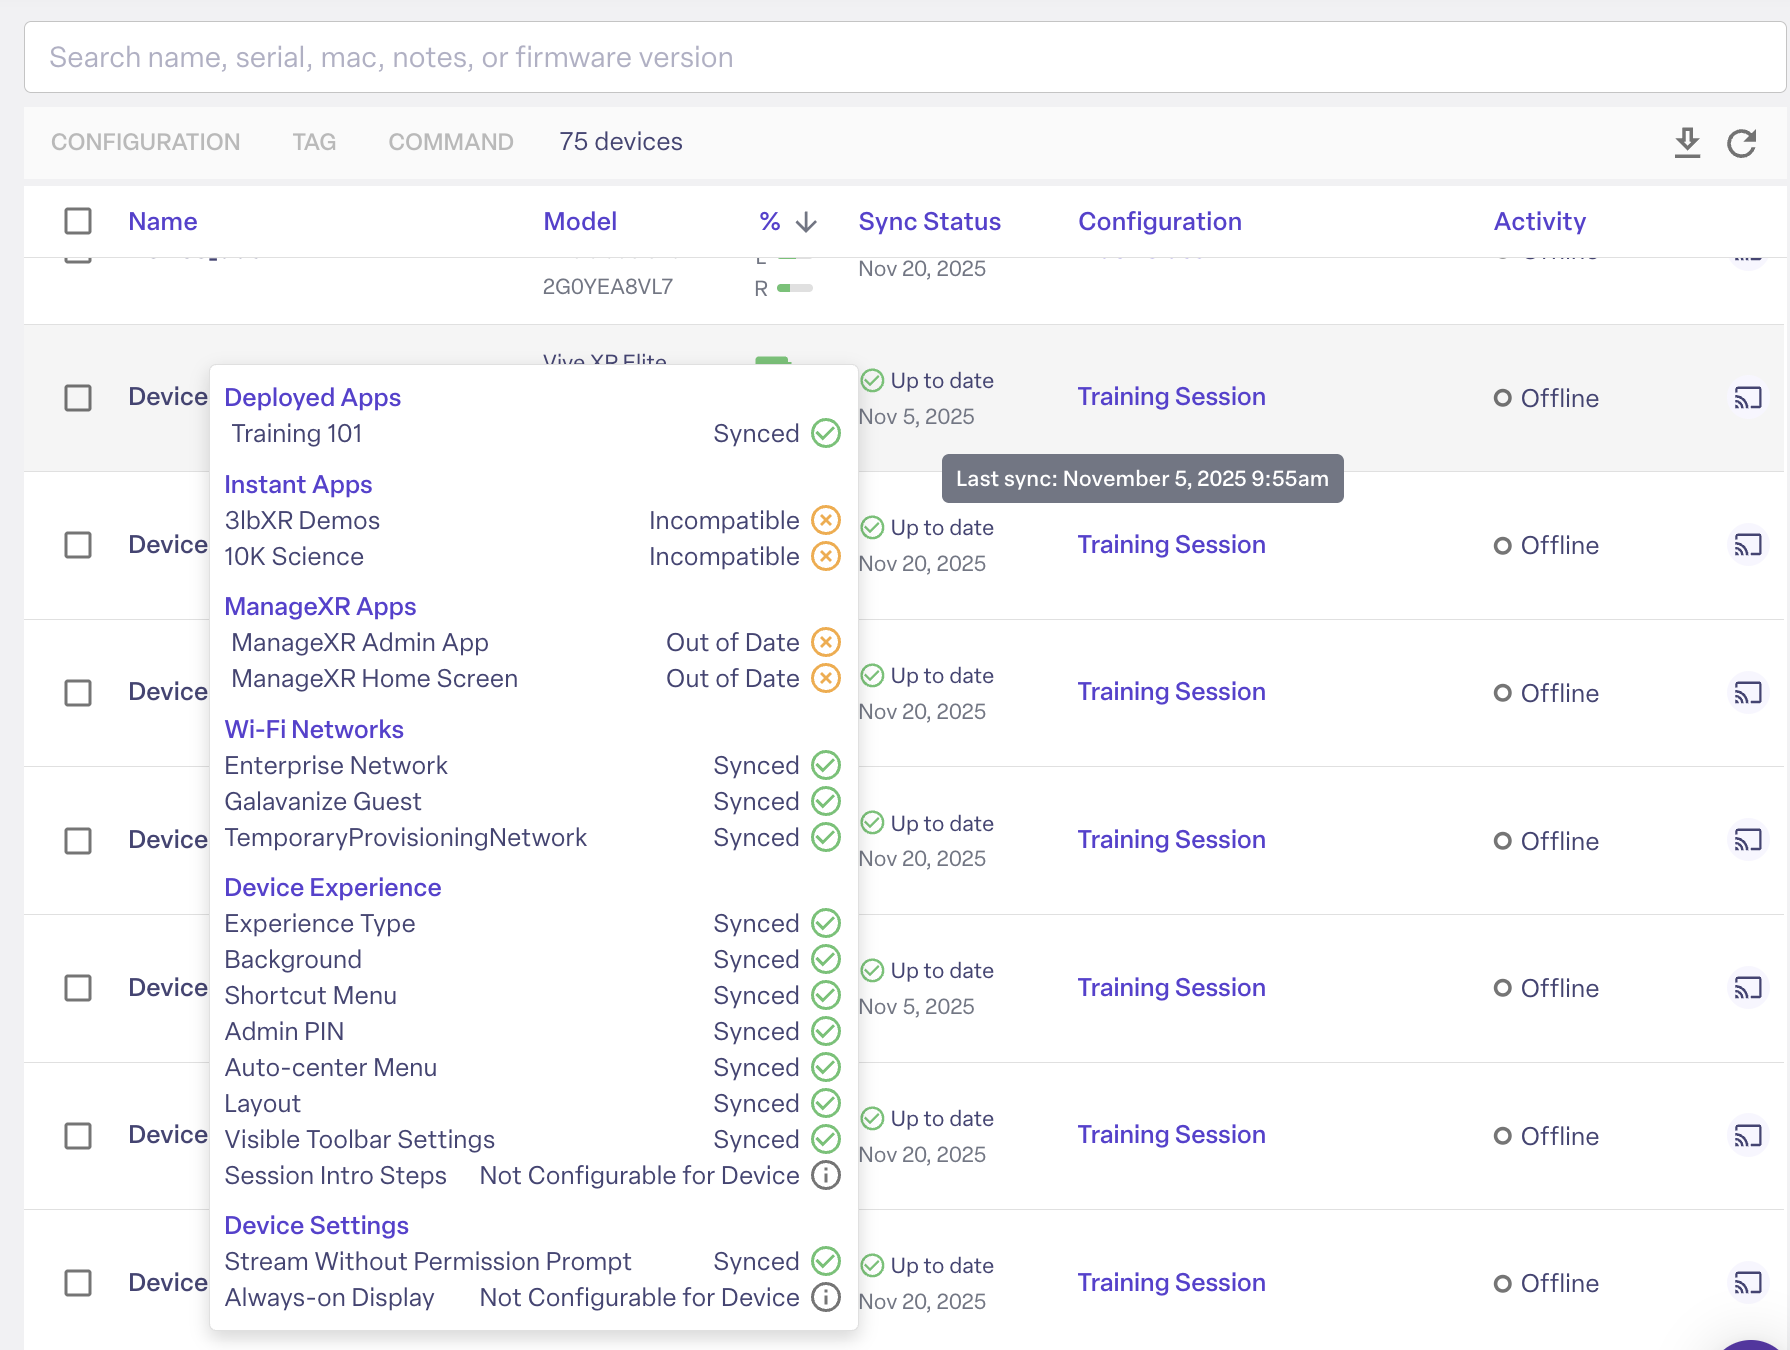
Ensure the correct VR content is installed, up to date, and ready to launch on each headset. ManageXR devices automatically sync when powered on and connected online. During a sync, devices check for configuration changes, updates, and pending commands, and report their status back to ManageXR automatically. Online devices sync about every 15 minutes. If something fails, the device will retry on the next sync.
You can verify that the latest content and settings are deployed, that all required lesson modules or files have been downloaded, and that any necessary licenses or permissions are active. This means the sync status for your devices should say “up to date”. If you hover over the sync status, you can see which apps and files are up to date.
Double-check your network
A reliable connection is important for app launches, updates, and device management. Before class, double-check that all devices are set to the correct Wi-Fi network and test network strength in the room where your lesson will take place. Use our network connectivity test to ensure your network does not block any required endpoints for ManageXR to work. On the device information page, you can see which network your device is connected to, as well as its speed. The network should offer a 5GHz frequency band to give your fleet a reliable bandwidth, and therefore more reliable downloads. It should also have a minimum download speed of 200mpbs to support large downloads.

Establishing this pre-class routine minimizes disruptions and ensures that students spend as much time as possible engaged in their VR experience.
Running a VR class session
During a VR class session, it’s essential to maintain visibility into what students are experiencing so you can guide learning, troubleshoot issues quickly, and keep everyone on task.
With Rooms, you can confidently run a live VR classroom by monitoring, supporting, and directing student devices—all from a single dashboard.
Launch Your Room
Start your class by launching a Room, which brings all student headsets into a shared, managed environment. Rooms gives you a stream of every student’s screen in one grid, so you always know what students are seeing and doing.
With Rooms, you gain full visibility and control over each headset during the session:
- View all student screens live to monitor progress and engagement
- Send remote commands to individual or multiple devices
- Receive automatic alerts when devices need attention
- View off-task and on-task participants, and launch them into the correct task
For example, Rooms will notify you if a headset's battery is low, if an app crashes, or if a student is in the wrong application. Instead of interrupting the lesson or walking from device to device, you can instantly launch the correct app on the student’s headset and bring them back on track.


Remote Commands
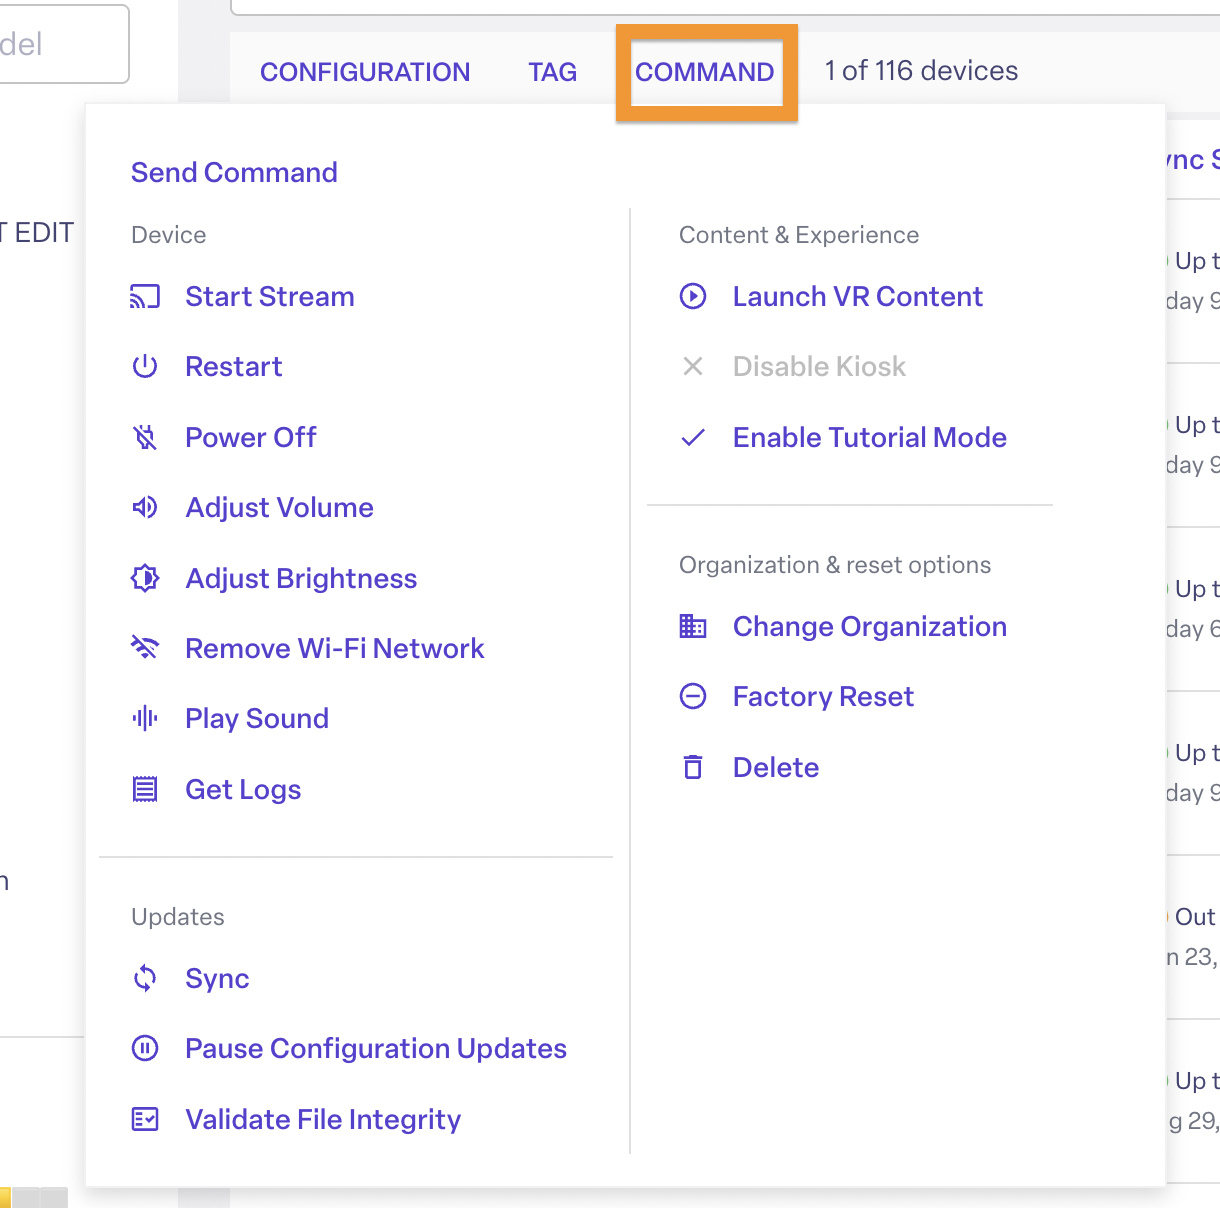
Remote Commands allow you to manage device settings directly from the ManageXR console, reducing distractions and saving valuable class time. You can:
- Adjust headset volume or brightness based on student feedback
- Restart devices if something isn’t working correctly
- Launch students into the correct VR content
- Power off devices at the end of class
While students can control some of these settings themselves depending on the configuration settings you enable, giving teachers control minimizes interruptions and allows students to stay immersed in the lesson rather than troubleshooting their own devices.
Prepare Ahead
Even the best-planned VR lessons benefit from a backup plan. Preparing ahead helps ensure your class runs smoothly, even if something unexpected happens, such as an unreliable internet connection.
Best practices include:
- Install all VR content in advance so lessons aren’t dependent on live downloads
- Update devices’ configurations ahead of time using the Device Setup Tool when internet access is limited or slow. This is a wired update process.
Resetting devices for the next class
After your class VR session is completed, you’ll want to reset and organize your devices so they’re ready for the next class. In practice, this can look like having students wipe down their headsets and return them to a charging cart or wall.
From the ManageXR console, you can remotely power off all headsets, ensuring that once online again, they are restored to the home screen or the start of the kiosk environment, depending on your device experience.
Best practices & tips
Device Hygiene
Before and after each class, wipe down headsets and controllers with non-abrasive cleaning wipes, paying special attention to face pads and hand grips.
Consider using disposable face covers, which are easier to sanitize between uses. Allow devices to fully dry before the next session, and store them in a clean, well-ventilated space. Clear hygiene routines help students feel comfortable using shared equipment.
Create a Student VR Support Team
Empowering students to assist with basic VR setup and troubleshooting can dramatically reduce classroom downtime. Designate a small group of trained students as your VR Support Team to help with tasks like adjusting headset students’ fit and plugging devices in for charging between class sessions.
This approach not only lightens the teacher’s workload but also builds student confidence with emerging technology. With clear guidelines, student helpers can resolve minor issues quickly while the teacher stays focused on instruction.
Rotate Students to Avoid Fatigue
Extended time in VR can cause eye strain or physical fatigue, especially for younger students or first-time users. Plan lessons with intentional breaks and rotations so students alternate between VR activities and complementary offline tasks, such as worksheets or discussions. We recommend keeping students in the headset for 15-20 minutes at a time.
Use Tutorial Mode for First-Time Users
For students new to VR, jumping straight into a lesson can feel overwhelming. Start with a brief tutorial or orientation experience that teaches basic controls, movement, and safety boundaries before introducing instructional content.
Tutorial mode with ManageXR lets you select a tutorial VR experience to launch students into when they first put on the headset, so they can learn the essentials of navigating within VR: adjusting device settings, entering and exiting an app, and using controllers.
Get started with ManageXR
With the right tools and planning, running a successful VR classroom becomes routine. Start with your VR classroom goals, then use ManageXR to gain full control over your devices and curate the student experience.
Need advice about your VR program? Meet with our VR experts and get a demo of ManageXR. Or, if you would prefer to explore the platform on your own, you can check out our free interactive demo.
If you already have devices and are ready to start managing them, start a free 30-day trial with ManageXR.